Sunday, September 8, 2013

Tuscan Turkey Sausage Soup

Guess what?  It is September.  Know what that means?  It is officially time for fall food.  What better way to start than with a nice hardy soup?  Tuscan turkey sausage soup is so good for you.  It is stuffed full of vegetables and whole grains.  It is also delicious.  My boyfriend hates soup, but he loved it.  It also got my coworkers seal of approval.  


 Tastes like comfort and warmth.
The best part is, you can make it all in one pot!  Well, if you have a huge pot that is.  I don't know what happened to mine.  I am pretty sure my neighbor has claimed it.  Don't worry about the amount it makes; it freezes very well.  Then you can have fresh preservative free soup whenever you want!

Two big pots = one huge

Also, it doesn't take all day to make.  Yes, the longer you cook soup, the better it taste.  But this stuff is so full of flavor, you won't even notice.  


Here is the recipe:

Ingredients:
2 lbs sweet turkey sausage (getting the links is fine if you have to, just empty them out)
1 lb whole grain bow-ties (or any fun shape of your choosing)
4 quarts chicken stock
3 carrots, chopped
6 oz fresh spinach
15 oz can chickpeas, drained
2 cans of diced tomatoes (15 oz a piece, don't drain)
1 onion, chopped
4 cloves garlic, minced 
1 T dried basil 
1 t red pepper flakes
salt and pepper to taste
grated Parmesan cheese 

Directions:
1. Add carrots and sausage to a large saucepan and cook until the sausage is browned
2. Add onion and garlic, cook until carrots are tender
3. Add chicken stock, tomatoes, chickpeas, basil, red pepper, and pasta.  Bring to a boil
4. Reduce to a simmer and cook for at least 15 minutes
5. Add spinach, season, and cook until tender
6. Serve and top with Parmesan cheese, if desired. 


Saturday, August 31, 2013

Fall Egg Melt

I am addicted to sandwiches.  I usually cannot go a day without eating a sandwich.  No, I don't want to go to meetings to cure my problem.  A world without sandwiches is a world I don't want to live in.  If you think you don't like sandwiches, think again.  Sandwiches are not all sad excuses of lunch meat with processed cheese product on them.  Get creative with it.

Fall is approaching quickly.  We already started getting pumpkin shaped candy in my store.  I am super excited, because when fall comes around I put pumpkin in everything I eat (everyone who lives with me hates this time of year after a week).  It is not quite time for that yet.  Still, when I got home from work yesterday, I wanted a taste of fall.  Thus, the fall egg melt was born.

It isn't hard to make, and most of the ingredients should be on hand.

Start off by sauteing about half of a small yellow onion.

Fun fact: this is my special sandwich pan.  Only sandwiches and sandwich ingredients allowed!
Sandwiches = serious business
 You just have to get them translucent.  You can cook them a bit longer if that is what you prefer.  Caramelized onions would be awesome for this, but alas, I was hungry and didn't have time for that.

While the onions are doing their thing, put a few pinches of dried cranberries on a piece of your favorite whole grain bread.  Don't like whole grain bread?  Whats wrong with you? You can use pumpernickel instead, just add a few more cranberries.


They taste great and are great for you, what's not to love?

It may sound odd to some people, but trust me on this.  The slight hint of sweet in the savory is awesome.  Get out of your comfort zone a little.  

Once the onions are finished, add them on top and cook up an egg white.


Then go ahead and put the egg white on and add a little shredded mozzarella.


Add another slice of bread to the top and put the whole sandwich back on the stove.  You want to finish it off like it is a grilled cheese.  If you normally burn your bread before your cheese is melted, try turning down the heat.  The key is a lower heat for a longer time. Here is the finished product:


This sandwich was so good, I almost didn't breathe while I was eating it.  It is a nice healthy way to bring in the fall.

Here is the recipe:

Ingredients:
2 slices of your favorite whole grain or pumpernickel bread (I used Arnold's Healthynut with flax)
1/2 small yellow onion, chopped
1/4 cup dried cranberries
1 egg white
1/4 cup shredded mozzarella cheese
nonstick cooking spray

Directions:
1. Spray a small pan with nonstick cooking spray and let it heat up
2. Saute onions until translucent
3. Put dried cranberries on a slice of bread
4.Pick at some dried cranberries while you are cooking
4. Add onions to the slice of bread
5. Cook egg white in same pan as onions
6. Add egg white and cheese to the bread
7. Close sandwich and put it into the pan
8. Cook as you would a grilled cheese sandwich
9. Enjoy!


Saturday, August 24, 2013

Birthday Card Charity

I have been looking through scholarship opportunities recently when I came across a neat one from Do Something.  To apply you have to hand make birthday cards for homeless children and mail it to a local family shelter.  I thought this was a super fun way to give back, and I had always wanted to try my hand at card making (I make awesome painted cards, but I never really tried any paper crafts).

I went out that night and picked up some supplies.  

Okay, I had some of this stuff laying around
I started off with a basic idea of what I wanted them to look like and played around with it before gluing everything.


It was all surprisingly easy, then again, these are not the best homemade cards in the world.  They do come from the heart though, and that is what kind of counts.

Soon I was adding more and more embellishments to them.


Before I knew it, I had over 20 of them completed.

Fancy shot

All slayed out

Hopefully any kid that gets one will enjoy it.  I know I had fun making.  I think I will keep working on my skills with this one until I am able to make those fancy cards!

The picture I took for Do Something's website

If anyone is interested, Do Something has some pretty interesting ideas on how to give back to the community.  Most of them will make you eligible to win a scholarship, but honestly just giving back is the fun part.  By the time I started this project, I already stopped caring about the scholarship.  It's all about helping others yo.  


Saturday, August 17, 2013

Paint Fail

Sometimes it is hard to find good advice in a small town.  Especially when there is no specialty shop in the area for what you are doing.  So I did the next best thing.  I looked up what to do on the internet.  I found a site that told me exactly how to do what I wanted to do.  Then I went to my local home improvement store to get the materials that I needed.  The woman that was helping me asked me what I was working on, I told her, and then made the mistake of listening to her advice.

I had an old CD storage stand that I was turning into a spice rack.  I currently keep my spices in a terrible place (above my stove) where they go bad so quickly.  My new spice rack would look so nice next to my counter and save my spices.  The only thing I had to do was paint it white to match my counters.


I knew from my research that in order to paint something made out of particle board, without having to sand it, you should always use an oil based paint.  Armed with this knowledge, I went into the paint section and asked for an oil based white paint with a satin finish.  After talking to the woman for a bit, she told me to use this other water based paint instead.  I figured she worked in the paint department for a living, she had to know her stuff.  I should have been stubborn and stuck to my original plan.

The piece looked lovely when it was done.  Until I tried to put the shelves back on.

This happened.


I let it dry for a week.  I even put on this fancy top coat.  I was so upset.

I know it is possible to paint partical board without having to sand it.  After all, I painted my white bookshelves black over eight years ago and they still look okay.

And this thing takes a pounding!
So now I am waiting on borrowing an electric sander so I can do this project the right way.  

On a little side note, you can now expect this blog to be updated every Saturday.  Hooray!


Thursday, July 11, 2013

Natural Pancakes (For The Pintester Movement 2.0)


Hi everyone!  Since the last Pintester Movement that Sonja Foust hosted was so much fun, I jumped on the opportunity to participate in the second one.  This time around I decided to try out these Natural two ingredient pancakes that was already tested on Pintester.  I figured this would be perfect, since I am trying to eat healthier and I always just happen to have bananas and eggs on hand.

I love making food smile before I devour it
Two eggs and one banana is seriously all it takes.  It easy made enough pancakes for two people.  All you have to do is smush the banana in a bowl and add in the two eggs.  Make sure to smash up the banana first, it makes the process a whole lot easier.

When the batter is ready, it doesn't look that great.  I still had a few banana chunks.  It also cooks at a slightly lower temperature than normal pancakes do.
Looks quite a bit like baby vomit at this point
They do look a lot better when they are cooked.  By looks alone they can pass for pancakes.


The taste was also pretty good.  I added some of this wonderful butter pecan syrup I found on top of it and they were perfect.  My boyfriend even liked him.  The only thing that got to me was the texture.  It was like eating a pancake flavored omelet.  Still, they were not bad at all, and much quicker to make than regular pancakes.


Monday, July 8, 2013

Adventures In Dehydration

So, there has been a dehydrator just sitting in the box in my study collecting dust since the holidays (I have a small kitchen yo).  The idea of using it was a little daunting.  I was super worried about not leaving things in long enough, leaving them in too long, wasting food, and being an overall failure at it.

A sale on strawberries finally made me break down and use it.  I had so many and didn't know how to use them all before they went bad.  I decided to make some homemade fruit leather out of it.  Many of the recipes I found could be made in an oven, but highly suggested using a dehydrator instead.  I gave in and decided to try it out.

The fruit leather was super easy to make.  It starts with cut up fresh strawberry bits in a double boiler, or if you are me you just use a pot inside a slightly bigger pot.  Cooking level: college student.


Omnomnom

You know the strawberries are done when they become mushy and a lot of syrupy juice leaks out.  The next part calls for a blender, but I don't trust mine ever since my ex roommates left some kind of juice in it for a very long time.  I really should just throw it out and buy a new one since I refuse to use it anyways.

Once again, I had to improvise.  I used a potato masher.  It worked pretty well, it would have been better with some kind of blender, but it still was acceptable.

I was also a bit unsure of using plastic wrap on a dehydrator tray.  I figured that would make it not work right or something.  Well, it was all part of the experiment, so I gave it a try.

I spread the strawberry goop as evenly as possible on the tray and let it dehydrate for about six hours or so.

Doesn't look too great.
The Pintester did something really similar using her oven, and I think she put it best.  It looks like dried up menstrual flow.

However, it still tasted really good.  A little tart, but really good.

I did mess up a bit.  My dehydrator is a little uneven in it's dehydrating.  The half that I tested was nice and ready, the other half still was a little moist.  I just ate that part and saved the rest.


Since the fruit leather only took up one tray, I decided to get a little adventurous and try my hand at something else at the same time.  I had an apple in my fridge just begging to have the moisture pulled out of it.

I was a little worried, every website I looked at suggested using something called "fresh fruit" to stop fruit from oxidizing in the dehydrator.  It might just be me, but I always assumed people got dehydrators to eat heathy and stay away from any kind of preservatives.  I knew I still had a bunch of lemons, and that lemons prevent oxidization.  Since it was only one apple, I soaked the slices in a bath of cold water and fresh lemon juice instead and gave it a shot. 

Lemon apples taste pretty good by themselves
They got a tiny bit brown, but not enough to bother anyone.  Actually, I think they came out pretty good.  I should have peeled the apple first, leaving the peel on makes it take a lot longer to dehydrate.


Then I got the fever.  The "will it dehydrate" fever.  This was the most fun I had since my "will it blend  smoothie making phase.

I tried my lemon water trick with bananas.  I didn't let them dehydrate all the way, instead I took them out when they were still a little gummy like.  As long as you eat them in a few days and keep them refrigerated  they make a really good snack.  I defiantly will try them again fully dehydrated too.
   
Healthy goodness
I also did some carrots.  Apparently, you are supposed to cook them and shock them a bit.  I think they came out just fine.  They are great when I want something healthy and crunchy.


I did a batch of oranges too.  However, they were mostly eaten while they were dehydrating, so I didn't get a picture.  They would be great for homemade teas.  I want to try lemon slices now too.

I learned a lesson.  Dehydrating things is simple, requires little effort, and produces great results.  I highly suggest giving it a try.  The price of the unit is well worth all the cheap healthy snacks.  I am looking forward to making new fruit leathers and trying new fruits and vegetables.  


Saturday, July 6, 2013

Star Trek Science Dress

Okay, so I am a huge Trekkie.  Every series holds a special place in my heart.  However, no series tops my love for the original.  I love the costumes, the cheesy animations, the sound effects, the crew, the banter, I love everything about it.

That being said, for the first science fiction and comic book convention that I was able to actually make in years I had to dress up in a TOS science dress.

However, I quickly realized that for a high quality dress it would cost me about $500, which was over half my budget for the convention.  Add in a TOS command wrap for my boyfriend, and we simply would not have been able to go after we got our costumes and props.  

Then I thought to myself, I know how to sew!  I will make the costumes!  They will be glorious!  I ordered the necessary props online and went out to hunt for fabric.


I decided to go a little cheaper on the rank bands and used something I found in the fabric store.  That way I could totally justify getting phasors to go with the costumes.  

I was originally going to design and sew the dress free hand, but that dress is a lot more intricate than it looks.  Fortunately I found a pattern online on this fourm.  Amazingly, the specifications were for my size!  Until I realized after I made it that I had been dieting for the last few months, so it did end up being pretty loose on me...

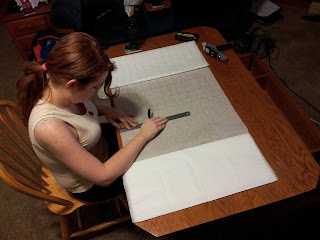
So to blow up the pattern in a way that it stayed accurate,  I used this huge ream of thin paper I had and painstakingly drew a grid with 16X16cm squares.  This took me and my boyfriend three days.


I got to watch a lot of Star Trek and Hercules during that three days (and yes, that is a Cardassian sunrise in that cup).

Once that was done, I used my dormant drawing skills to draw the pattern onto the graph.  Everything was going great.


Then booze got involved.  Because everything is a lot more fun when your drinking amirite?  Still, the next step of pinning and cutting out came out okay.  


Trying to piece the pieces together was much more difficult than it should have been, and I ended up going with a "as long as it f***ing stays together" approach.


I realized half way through that the seams were wrong, but I was already behind and there was no way in hell I was going to take a seam ripper and redo it.  I added a zipper that went along one of the decorative back seams to make it less intrusive. 

I completely freehanded the command wrap using a shirt as a size base, since I was fairly overconfident from sewing three successful shirt wraps when I was a freshmen in high school.  Did I also mention I was sober back then too?


Sorry about the butt shot, my boyfriend was the photographer for this one.  Oh, and the reason this fabric was not ironed was because my iron actually broke on the dress.  Go me.  

Since the drinks kept on getting stronger, his did not come out all that good.  I felt really bad about that. However, we still were better than some of the super cheap store bought halloween costumes that were walking around that the convention.  The man walking around as Scotty put everyone to shame though.

Here are the finished outfits.


He was such an amazing Scotty.  I felt inadequate standing next to him.


Killing an undead redshirt and an adorable undead tribble.


My captain with Scotty.

Even if our outfits are less than perfect, we still had just as much fun making them together as we had at the convention itself.  I am actually going to remake them, when I have a longer amount of time (one week was not enough) and I am not drinking.

The best part?  Most of the Next Generation cast was at the convention, and all of us trolls that dressed up in TOS outfits got such dirty looks the whole time.  Come one guys, why would you hate on other Trek lovers?  Even if they have a different favorite series, it is irrelevant.  Trekkies have to stick together.