Thursday, December 12, 2013

Wine Cork Wreath

Hey everyone!  I know it has been a while again.  Sorry, the end of this semester was rough.  I did manage to pull off some fun projects to share with you; I just didn't have the time to dedicate to posting them.  So you all can expect regular updates again!  Thank you so much for all of your patience. 

I was so excited about this one that I had to share it on my Facebook page as soon as it was done.  I was browsing the internet a few months ago and came across this wreath.

I have no idea who created this, if you do let me know so I can give them credit.

I instantly fell in love.  I knew it was something that I had to make.  So I did what any logical college student would do and started buying wine.  Well, while that was a lot of fun, I wasn't getting enough corks for this project in a reasonable amount of time.  You can buy corks on Amazon, but that was just too expensive (70$ for 100 corks?  I would rather buy the wine!).  I was stuck.  That is when my amazing alcoholic friends came to the rescue.  Within a few weeks I had a shopping bag half full of corks.  <3  I have awesome friends.

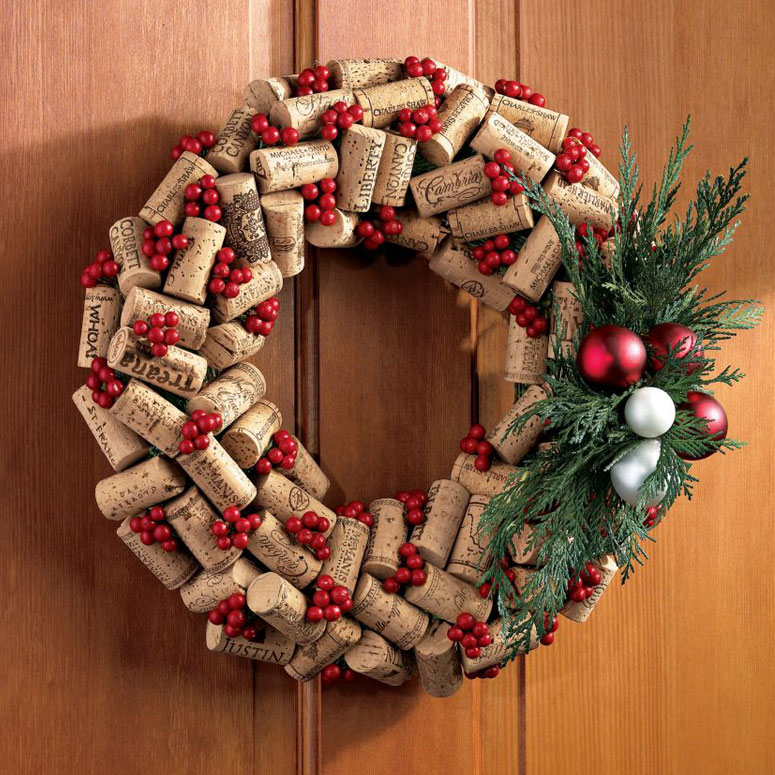
I ran out to my local craft store to purchase a wreath form and some decorations for it.  I decided to go with a grape vine one because it just felt appropriate.  That way, if there are any gaps they don't stand out as much as they would on styrofoam a or straw one.   I found this one for around $3!


I wasn't having much inspiration for the decorations on the wreath.  I wanted the fake holly berries, but the selection was lacking since it was still October.  I finally stumbled across a lovely piece of garland complete with the berries, leaves, and poinsettias.  At 5$ it was absolutely perfect.

I started off by simply hot glueing the corks to the wreath, making sure not to follow any particular pattern or direction and filling any major gaps.  I have seen a few of these where all the corks look organized and face the same direction, but they were just not as appealing to me.  I like the orderly disorder approach.


This also means I got to finally break in my new hot glue gun!  Now the other one can be repurposed for all of the melted crayon crafts I have been wanting to try.

Just keep on filling in the wreath until you are pleased with how it looks.  Remember, small gaps are fine.  It shows off little glimpses of grape vines.


Once the body of the wreath was finished, I cut apart the garland and played around with the pieces until I came up with something I liked.


This is what I settled on.  There is not as much color in the original, but I still love how it came out.  Overall, the project cost me about 8$, not including the price of wine, and only took about an hour to put together. 


Honestly, I am planning on making more over the next year and using them as gifts.  Sorry to all my friends, and thank you for abusing your livers for the sake of crafting!


Thursday, October 17, 2013

Caramel Pecan Pumpkin Cheesecake

I am sorry for abandoning you guys for a while.  It was midterm time, and honestly I didn't cook or craft much in that time.  I will make it up for you in this week of extra posts.  Please don't hate me/egg my house.

This recipe should help gain your faith in me back.  

The base for my pumpkin cheesecake comes from a recipe Emeril Lagasse featured years ago; before anyone knew who Gordon Ramsey was.  Of course I modified the recipe almost beyond recognition.  Honestly, my best advice to give to a baker or cook is to learn the science behind making food.  Almost anyone can just follow a recipe; a good cook learns how to make it their own.  Use recipes for inspiration and add in or substitute what you really want in there.  If you are starting out and are unsure, learn by trial.  Mistakes simply help you learn.

Now that I am off of my soap box, here are instruction on how to make my version of this pumpkin cheesecake.


Instead of buying graham cracker crumbs, I always prefer to crumble them myself.  It can be a little rough on the hands, but it is really easy to do and takes little time.  That way, the left over graham crackers can be eaten and not just sit around in my cabinet in crumb form forever.  To make enough for this recipe it takes about a sleeve plus two more cracker sheets.

Make sure to wash your hands really well first, unless you hate the people you are feeding it to.
I also like to take the cheap route and chop up my own pecans.  I use them for garnish too, so buying the prechopped stuff just doesn't cut it.


The biggest thing people forget when making a cheesecake is that they are not cakes.  They are delicate custards that will  not be fully firm when you take them out of the oven.  If you over bake them the consistency will suffer and you will form cracks.  Only keep it in until the sides of the cheesecake no longer giggle when moved.  It should only take 60-70 minutes.  I lost track of time and left mine in for ten minutes too long.  This is what an overcooked cheesecake looks like.

It should not look like an earthquake hit it.
Also remember, cracks can form after you begin to cool it.  If you have a small crack while it is still baking, you can bet on there being more later.  It is not always a disaster when this happens; just remember it is not going to be as good.  It will still most likely be good.

I also must stress that if you are having trouble making cheesecakes, that you should try cooking them by weight instead of volume measurements.  This means add ounces, not cups.  Honestly, this is the only cheesecake that I make this way, mainly because I have yet to have any problems with it.

When making a caramel sauce, it is really important to use a double boiler and not just make it in a pot.  You don't want to burn the sauce.  You also don't want the water at a rolling boil either; just a light boil with bubbles breaking the surface every second is more than fine.  Don't have a double boiler?  Take the cheap college student way out.  A pot inside of a pot or a metal bowl inside of a pot works just fine.  Be careful though.  You don't want that falling on you.

Because who has room for a double boiler?
Now that all special directions are out of the way, here is my caramel pecan pumpkin cheesecake.


Ingredients:
1 3/4 cups cinnimon graham cracker crumbs
1/4 cup finely chopped pecans
1 tablespoon dark brown sugar
1 stick melted unsalted butter
3 packages of cream cheese (8 oz each at room temperature)
1 1/2 cup sugar
2 tablespoons cornstarch
1 teaspoon vanilla extract
1/2 teaspoon cinnimon
1//2 teaspoon nutmeg
2 eggs
2 egg yolks
15 ounces pumpkin puree 
1/4 cup heavy cream
equal parts soft caramel and heavy cream (about 1/4 cup of each, as desired)
whole pecans

Directions
1. Mix together the graham cracker crumbs, chopped pecans, and brown sugar in a large bowl
2. Preheat oven to 350 degrees Fahrenheit.
3. Mix butter into graham cracker mixture
4. Press graham cracker mixture evenly into the bottom of a spring form pan.  Let the mixture come up the sides about an inch
5. In a mixer beat cream cheese, sugar, and cornstarch on low until smooth and creamy
6. Add in the spices and eggs, mix until incorporated.
7. Add the pumpkin and heavy cream, mix until the batter is consistent.
8. Pour into spring form pan and bake for 60-70 minutes or until just the sides don't move when the pan is gently shaken (always put your spring form pan on top of a sheet pan)
9. Let cool for at least one hour before preparing the caramel.
10.  Arrange whole pecans on top as desired
11.  In a double boiler melt caramel and heavy cream, stirring constantly
12. Drizzle over cheesecake while the caramel is still hot.  It will solidify and be hard to work with once it cools.


Monday, September 30, 2013

Light Pumpkin Pasta with a bonus of Pumpkin Cream Cheese


That white girl will totally be me.  I hope you all are prepared for this; I held out as long as I could.  If you don't like pumpkin you might want to skip out on this blog until the end of fall (don't do that, I have some cool crafts coming up).

My mother once told me never to give out my best recipes.  It will insure that you are always invited to parties as long as you know how to make it and no one else does.  Well, pumpkin pasta is one of my best tricks, and everyone around me knows that if they invite me to a party in fall, they will get a ton of it.  It hurts a little bit to put this one out there, but I am a pretty giving person, and you all deserve to be able to try it.  

However if I stop getting invited over to places in the Fall, you will never get my other great seasonal staples. >:(

Well, now that my little warning is out of the way, here it is: my fall staple, pumpkin pasta.  I have only had one person that was iffy about it, but it was this last time I made it and I didn't have the right wine or sausage.  Many people make faces when I tell them about it, but savory pumpkin dishes are awesome.  Even people who hate pumpkin enjoy this dish.

Pumpkin in ALL THE FOOD!
The first time I made this, it took hours.  Tweaking the flavors, adding things and adding more things, washing utensils I didn't think I would need anymore.  It was a mess.

Luckily, I now have the recipe perfected to my tastes, and everything runs a lot smoother.  It only takes about an hour to prep and cook.  With the directions in hand, it shouldn't take you much longer than that either. 

It is also low mess dish.  A pot, pan, cutting board, and a few tools and utensils.  I should warn you though, it is another one of my dishes that can feed a small army.  There are about ten servings at about 275 calories per serving.

It pairs well with whole grain breads and spinach salad with fresh cut apples in it.  If you use a dressing for this, use a light vinaigrette.  I used to make a homemade pomegranate dressing for this salad, but I have been hesitant to buy a pomegranate after a mold incident two years ago.  Perhaps I will take one for the team for you all and give you the recipe for that one too...  

Anyways, here is the recipe.  I highly suggest you try this one out.

Ingredients:
1 pound sweet turkey sausage links (it is also pretty good with pork if you absolutely cannot find turkey, just not as healthy)
1 pound whole wheat penne pasta
1 medium onion, small dice (cut it into squares the size of playing dice if you can)
1 cup dry white wine
1 cup low sodium chicken stock
1 cup canned pumpkin
1/2 cup low fat half and half
1 tablespoon olive oil
5 cloves of garlic, minced
1 bay leaf
1 tablespoon rubbed sage
1/2 teaspoon ground cinnamon
1/2 teaspoon ground nutmeg 
salt and pepper to taste

Directions
1. Heat a large pan with olive oil and brown the sausage until fully cooked in the center (this is a good time to chop up the onion and garlic while you are waiting)
2. Remove sausage from pan and add onion and garlic to pan
3. Cook over medium heat until the onions begin to brown
4. In a large pot, bring water and salt to a boil for the pasta (make sure to pour it in as soon as it starts boiling, don't forget until the end like I have)
5. Slice sausage and cut each little round in half
6. Add bay leaf, sage and wine to the pan.  Simmer for about 3-4 minutes
7. Add pumpkin and chicken stock to the pan, bring to a simmer
8. Reduce heat and add half-and-half, cinnamon, nutmeg, salt, and pepper
9. Return sausage to the pan and simmer for about 5-10 minutes
10. Remove bay leaf and pour over drained pasta
11. Mix together and enjoy!


So anyone who cooks with a lot of pumpkin (that might just be me) will look at this recipe and say "Hey!  One cup is not a whole can of pumpkin!  What am I supposed to do with the rest of this stuff!"  No worries, I have your back.  I will be posting more recipes that don't take a whole can and other little things you can do with it all season long, but I didn't want to leave you hanging.  

Here is the bonus recipe: Pumpkin Cream Cheese


This is so easy to make, and it only takes about a minute.  It is so good on bagels, and it is versatile enough to use it on anything you would use regular cream cheese.  You can use whatever cream cheese you want to, just keep in mind that original and honey flavors work best.  If you are using honey flavored, make sure to taste it before you add additional honey.

Ingredients
Leftover pumpkin from previous recipe (the amount can vary if you have left over pumpkin from something else, make sure it is at least 2/3 a cup.
8 oz cream cheese (I used non fat for a healthier treat)
2 teaspoons cinnamon
1 teaspoon nutmeg
1 tablespoon honey

Directions
1. Combine ingredients in a large bowl and mix until the mixture is homogeneous (fat free cream cheese is a littler harder to work with, if you have a few white pieces left the world won't end and it will still taste good)
2.  Taste and adjust flavors to your liking
3. Store in a tight opaque plastic container 


Sunday, September 22, 2013

The Pintester Movement: Glitter Shoes


Hey guys, guess what?  It is time for another Pintester Movement hosted by the Pintester Sonja Foust!  If you have never visited her blog, you should check it out.  She is hilarious and tests all the pins you know you have wanted to try.

For the Pintester Movement a bunch of bloggers test out pins and post their results.  This time around I decided to finally try the glitter shoe craft by Pixie in Pumps and try to save my favorite pair of shoes.


I have had these awesome classic black heels since I was in high school.  Amazingly, they are still structurally sound.  However, my water heater went a while ago and all of my shoes were kept near it.  I threw them all away, except for this pair.  I shamefully still tried to get away with wearing them despite the damage to the leather.

Hey, no one could see it at night, right? :(
I knew that bad habit had to stop, so what better way to bring new life into them than by turning them into stellar glitter shoes?

The first step is to sand them down a bit.  I also had to remove the little bows with a seam ripper (I managed to stab myself doing this).

You can really see how bad the leather was after I sanded down the parts that were bubbling.
After that, you just mix up some mod podge with some fine glitter.  I used gloss, like the original blogger.  She really didn't say how much glitter to use, so I just dumped it in until it looked like fairy paste.

It's really hot pink, my camera didn't pick up on the color well.
I painted it on in three coats, getting chunkier and chunkier each time because I was getting tired.  Over all it didn't take too long.  About two hours, including trying to get those little bows off.  It would have probably been faster if I covered the areas I didn't want to have glitter like the tutorial said, but I am a rebel.

I do my best work on my kitchen floor

After the first coat, I wasn't too sure that it was going to come out right.  If you are trying this pin, just keep at it and keep on playing with the glitter to mod podge ratio.  It takes quite a bit of glitter to get a good coat.  

They actually came out really cute.  I always wanted a fun pair of statement shoes, but I was too cheap to make a commitment like that.  I added on an extra layer of mod podge to seal them after they were done and put on some new bows.


I wore them to meet a friend at the movies on a rainy day.  They held up perfectly!  I am sure that they can get scraped up if you stumble in them, but it will only take a touch up of mod podge and glitter to fix them.  How easy is that?

It was sunny 5 minutes before I had to leave. Florida summers...
If you have some old shoes that you were going to throw out, I would definitely suggest that you try this.  I am tempted to find out what else this can work on >:3


Sunday, September 15, 2013

Lighter Shrimp Thermidor

Sorry for the late post.  I have been nursing a migraine since yesterday, but I have finally came to terms that it is not going to go away anytime soon.  Anyways, I had a bunch of frozen shrimp in my freezer that had to get used, and my step-father was coming down to visit, so it had to be in something he would eat.  He is not the biggest fan of healthy eating of any kind, but I managed to sneak him this lighter version of the normally heavy dish.  He was none the wiser.

I also used some of the sauce to make chicken thermidor for my boyfriend.  He really doesn't like shrimp.  Normally I am the mean girlfriend that says "too bad, this is what I made", but I was feeling nice that night.

The dish is rather easy to make; however, there is a bit of cleanup at the end of the night.  two pots and a cutting board.  Okay, it is not that much cleanup, but I am lazy when it comes to dishes.  I do everything in my power to pawn it off on my poor boyfriend.  Hey, I do the laundry at least!

You start off by boiling water for the pasta while making the sauce.  Remember to always season your pasta water.  It really does make all the difference.


Also, if you don't have a high heat rubber spatula, I highly suggest you invest in one.  You won't be disappointed.  It is my single most used kitchen tool aside from my knives.  It makes not burning delicate sauces much less intimidating and lets you mix up all the edges.

You cook the shrimp right in the sauce (if you are using chicken, you have to cook that first in a separate skillet).

Then you just toss it all together once the pasta is finished and drained.

Finished shrimp thermidor

Okay, okay, you are supposed to use angel hair pasta for this, but I didn't have any in the house so I used linguine.  I didn't feel like going out for one easily substitutable ingredient, sue me.  If you never had shrimp thermidor, it is really good.  The capers really help to give the sauce a lighter feel to it and helps prevent it from overpowering the shrimp.  I never actually tried it out with chicken before, but I stole a bite and it was actually just as good.

Finished chicken thermidor

Here is the recipe for you to try out!

Ingredients:
8 oz whole grain angel hair pasta
12 oz shrimp, tails off (the small ones work best) OR 12 oz chopped chicken, cooked
10 oz broccoli, chopped
1/2 cup unsweetened original almond milk
1/4 cup low fat sour cream
1/4 cup dry white wine
1/4 cup water
2 T butter
3 cloves garlic, minced
2 T fresh lemon juice
2 t capers
2 t brown mustard (dijon, or horseradish)
1 t tarragon
1 t seafood seasoning
2 T flour
2 T grated Parmesan cheese

Directions:
1. Fill a large pot with water to boil for the pasta.  Remember to season the water and add the pasta when it starts to boil.  Angel hair doesn't take long to cook, so check it often.
2. Heat a large sauce pan and add the butter, garlic, capers, and mustard.  Cook on medium for about a minute, or until you can really start to smell the garlic.  Stir.
3. Mix in the wine, lemon, almond milk, sour cream, tarragon, broccoli, and seafood seasoning.  Simmer for another minute.
4. Add shrimp (or chicken) and continue to simmer until the shrimp is fully cooked.  About 4 minutes.
5. Whisk together flour and water in a cup with a fork.  Pour into sauce and simmer until thick, stirring occasionally.  It should take 6-7 minutes.
6. Turn off the heat and stir in the Parmesan.
7. Pour sauce over drained pasta and serve.

This dish goes really well with dark breads and salads.  I hope you enjoy it!


Sunday, September 8, 2013

Tuscan Turkey Sausage Soup

Guess what?  It is September.  Know what that means?  It is officially time for fall food.  What better way to start than with a nice hardy soup?  Tuscan turkey sausage soup is so good for you.  It is stuffed full of vegetables and whole grains.  It is also delicious.  My boyfriend hates soup, but he loved it.  It also got my coworkers seal of approval.  


 Tastes like comfort and warmth.
The best part is, you can make it all in one pot!  Well, if you have a huge pot that is.  I don't know what happened to mine.  I am pretty sure my neighbor has claimed it.  Don't worry about the amount it makes; it freezes very well.  Then you can have fresh preservative free soup whenever you want!

Two big pots = one huge

Also, it doesn't take all day to make.  Yes, the longer you cook soup, the better it taste.  But this stuff is so full of flavor, you won't even notice.  


Here is the recipe:

Ingredients:
2 lbs sweet turkey sausage (getting the links is fine if you have to, just empty them out)
1 lb whole grain bow-ties (or any fun shape of your choosing)
4 quarts chicken stock
3 carrots, chopped
6 oz fresh spinach
15 oz can chickpeas, drained
2 cans of diced tomatoes (15 oz a piece, don't drain)
1 onion, chopped
4 cloves garlic, minced 
1 T dried basil 
1 t red pepper flakes
salt and pepper to taste
grated Parmesan cheese 

Directions:
1. Add carrots and sausage to a large saucepan and cook until the sausage is browned
2. Add onion and garlic, cook until carrots are tender
3. Add chicken stock, tomatoes, chickpeas, basil, red pepper, and pasta.  Bring to a boil
4. Reduce to a simmer and cook for at least 15 minutes
5. Add spinach, season, and cook until tender
6. Serve and top with Parmesan cheese, if desired. 


Saturday, August 31, 2013

Fall Egg Melt

I am addicted to sandwiches.  I usually cannot go a day without eating a sandwich.  No, I don't want to go to meetings to cure my problem.  A world without sandwiches is a world I don't want to live in.  If you think you don't like sandwiches, think again.  Sandwiches are not all sad excuses of lunch meat with processed cheese product on them.  Get creative with it.

Fall is approaching quickly.  We already started getting pumpkin shaped candy in my store.  I am super excited, because when fall comes around I put pumpkin in everything I eat (everyone who lives with me hates this time of year after a week).  It is not quite time for that yet.  Still, when I got home from work yesterday, I wanted a taste of fall.  Thus, the fall egg melt was born.

It isn't hard to make, and most of the ingredients should be on hand.

Start off by sauteing about half of a small yellow onion.

Fun fact: this is my special sandwich pan.  Only sandwiches and sandwich ingredients allowed!
Sandwiches = serious business
 You just have to get them translucent.  You can cook them a bit longer if that is what you prefer.  Caramelized onions would be awesome for this, but alas, I was hungry and didn't have time for that.

While the onions are doing their thing, put a few pinches of dried cranberries on a piece of your favorite whole grain bread.  Don't like whole grain bread?  Whats wrong with you? You can use pumpernickel instead, just add a few more cranberries.


They taste great and are great for you, what's not to love?

It may sound odd to some people, but trust me on this.  The slight hint of sweet in the savory is awesome.  Get out of your comfort zone a little.  

Once the onions are finished, add them on top and cook up an egg white.


Then go ahead and put the egg white on and add a little shredded mozzarella.


Add another slice of bread to the top and put the whole sandwich back on the stove.  You want to finish it off like it is a grilled cheese.  If you normally burn your bread before your cheese is melted, try turning down the heat.  The key is a lower heat for a longer time. Here is the finished product:


This sandwich was so good, I almost didn't breathe while I was eating it.  It is a nice healthy way to bring in the fall.

Here is the recipe:

Ingredients:
2 slices of your favorite whole grain or pumpernickel bread (I used Arnold's Healthynut with flax)
1/2 small yellow onion, chopped
1/4 cup dried cranberries
1 egg white
1/4 cup shredded mozzarella cheese
nonstick cooking spray

Directions:
1. Spray a small pan with nonstick cooking spray and let it heat up
2. Saute onions until translucent
3. Put dried cranberries on a slice of bread
4.Pick at some dried cranberries while you are cooking
4. Add onions to the slice of bread
5. Cook egg white in same pan as onions
6. Add egg white and cheese to the bread
7. Close sandwich and put it into the pan
8. Cook as you would a grilled cheese sandwich
9. Enjoy!


Saturday, August 24, 2013

Birthday Card Charity

I have been looking through scholarship opportunities recently when I came across a neat one from Do Something.  To apply you have to hand make birthday cards for homeless children and mail it to a local family shelter.  I thought this was a super fun way to give back, and I had always wanted to try my hand at card making (I make awesome painted cards, but I never really tried any paper crafts).

I went out that night and picked up some supplies.  

Okay, I had some of this stuff laying around
I started off with a basic idea of what I wanted them to look like and played around with it before gluing everything.


It was all surprisingly easy, then again, these are not the best homemade cards in the world.  They do come from the heart though, and that is what kind of counts.

Soon I was adding more and more embellishments to them.


Before I knew it, I had over 20 of them completed.

Fancy shot

All slayed out

Hopefully any kid that gets one will enjoy it.  I know I had fun making.  I think I will keep working on my skills with this one until I am able to make those fancy cards!

The picture I took for Do Something's website

If anyone is interested, Do Something has some pretty interesting ideas on how to give back to the community.  Most of them will make you eligible to win a scholarship, but honestly just giving back is the fun part.  By the time I started this project, I already stopped caring about the scholarship.  It's all about helping others yo.  


Saturday, August 17, 2013

Paint Fail

Sometimes it is hard to find good advice in a small town.  Especially when there is no specialty shop in the area for what you are doing.  So I did the next best thing.  I looked up what to do on the internet.  I found a site that told me exactly how to do what I wanted to do.  Then I went to my local home improvement store to get the materials that I needed.  The woman that was helping me asked me what I was working on, I told her, and then made the mistake of listening to her advice.

I had an old CD storage stand that I was turning into a spice rack.  I currently keep my spices in a terrible place (above my stove) where they go bad so quickly.  My new spice rack would look so nice next to my counter and save my spices.  The only thing I had to do was paint it white to match my counters.


I knew from my research that in order to paint something made out of particle board, without having to sand it, you should always use an oil based paint.  Armed with this knowledge, I went into the paint section and asked for an oil based white paint with a satin finish.  After talking to the woman for a bit, she told me to use this other water based paint instead.  I figured she worked in the paint department for a living, she had to know her stuff.  I should have been stubborn and stuck to my original plan.

The piece looked lovely when it was done.  Until I tried to put the shelves back on.

This happened.


I let it dry for a week.  I even put on this fancy top coat.  I was so upset.

I know it is possible to paint partical board without having to sand it.  After all, I painted my white bookshelves black over eight years ago and they still look okay.

And this thing takes a pounding!
So now I am waiting on borrowing an electric sander so I can do this project the right way.  

On a little side note, you can now expect this blog to be updated every Saturday.  Hooray!


Thursday, July 11, 2013

Natural Pancakes (For The Pintester Movement 2.0)


Hi everyone!  Since the last Pintester Movement that Sonja Foust hosted was so much fun, I jumped on the opportunity to participate in the second one.  This time around I decided to try out these Natural two ingredient pancakes that was already tested on Pintester.  I figured this would be perfect, since I am trying to eat healthier and I always just happen to have bananas and eggs on hand.

I love making food smile before I devour it
Two eggs and one banana is seriously all it takes.  It easy made enough pancakes for two people.  All you have to do is smush the banana in a bowl and add in the two eggs.  Make sure to smash up the banana first, it makes the process a whole lot easier.

When the batter is ready, it doesn't look that great.  I still had a few banana chunks.  It also cooks at a slightly lower temperature than normal pancakes do.
Looks quite a bit like baby vomit at this point
They do look a lot better when they are cooked.  By looks alone they can pass for pancakes.


The taste was also pretty good.  I added some of this wonderful butter pecan syrup I found on top of it and they were perfect.  My boyfriend even liked him.  The only thing that got to me was the texture.  It was like eating a pancake flavored omelet.  Still, they were not bad at all, and much quicker to make than regular pancakes.


Monday, July 8, 2013

Adventures In Dehydration

So, there has been a dehydrator just sitting in the box in my study collecting dust since the holidays (I have a small kitchen yo).  The idea of using it was a little daunting.  I was super worried about not leaving things in long enough, leaving them in too long, wasting food, and being an overall failure at it.

A sale on strawberries finally made me break down and use it.  I had so many and didn't know how to use them all before they went bad.  I decided to make some homemade fruit leather out of it.  Many of the recipes I found could be made in an oven, but highly suggested using a dehydrator instead.  I gave in and decided to try it out.

The fruit leather was super easy to make.  It starts with cut up fresh strawberry bits in a double boiler, or if you are me you just use a pot inside a slightly bigger pot.  Cooking level: college student.


Omnomnom

You know the strawberries are done when they become mushy and a lot of syrupy juice leaks out.  The next part calls for a blender, but I don't trust mine ever since my ex roommates left some kind of juice in it for a very long time.  I really should just throw it out and buy a new one since I refuse to use it anyways.

Once again, I had to improvise.  I used a potato masher.  It worked pretty well, it would have been better with some kind of blender, but it still was acceptable.

I was also a bit unsure of using plastic wrap on a dehydrator tray.  I figured that would make it not work right or something.  Well, it was all part of the experiment, so I gave it a try.

I spread the strawberry goop as evenly as possible on the tray and let it dehydrate for about six hours or so.

Doesn't look too great.
The Pintester did something really similar using her oven, and I think she put it best.  It looks like dried up menstrual flow.

However, it still tasted really good.  A little tart, but really good.

I did mess up a bit.  My dehydrator is a little uneven in it's dehydrating.  The half that I tested was nice and ready, the other half still was a little moist.  I just ate that part and saved the rest.


Since the fruit leather only took up one tray, I decided to get a little adventurous and try my hand at something else at the same time.  I had an apple in my fridge just begging to have the moisture pulled out of it.

I was a little worried, every website I looked at suggested using something called "fresh fruit" to stop fruit from oxidizing in the dehydrator.  It might just be me, but I always assumed people got dehydrators to eat heathy and stay away from any kind of preservatives.  I knew I still had a bunch of lemons, and that lemons prevent oxidization.  Since it was only one apple, I soaked the slices in a bath of cold water and fresh lemon juice instead and gave it a shot. 

Lemon apples taste pretty good by themselves
They got a tiny bit brown, but not enough to bother anyone.  Actually, I think they came out pretty good.  I should have peeled the apple first, leaving the peel on makes it take a lot longer to dehydrate.


Then I got the fever.  The "will it dehydrate" fever.  This was the most fun I had since my "will it blend  smoothie making phase.

I tried my lemon water trick with bananas.  I didn't let them dehydrate all the way, instead I took them out when they were still a little gummy like.  As long as you eat them in a few days and keep them refrigerated  they make a really good snack.  I defiantly will try them again fully dehydrated too.
   
Healthy goodness
I also did some carrots.  Apparently, you are supposed to cook them and shock them a bit.  I think they came out just fine.  They are great when I want something healthy and crunchy.


I did a batch of oranges too.  However, they were mostly eaten while they were dehydrating, so I didn't get a picture.  They would be great for homemade teas.  I want to try lemon slices now too.

I learned a lesson.  Dehydrating things is simple, requires little effort, and produces great results.  I highly suggest giving it a try.  The price of the unit is well worth all the cheap healthy snacks.  I am looking forward to making new fruit leathers and trying new fruits and vegetables.